Monday, July 21, 2014

A Recap ... And a Reveal - Part 2

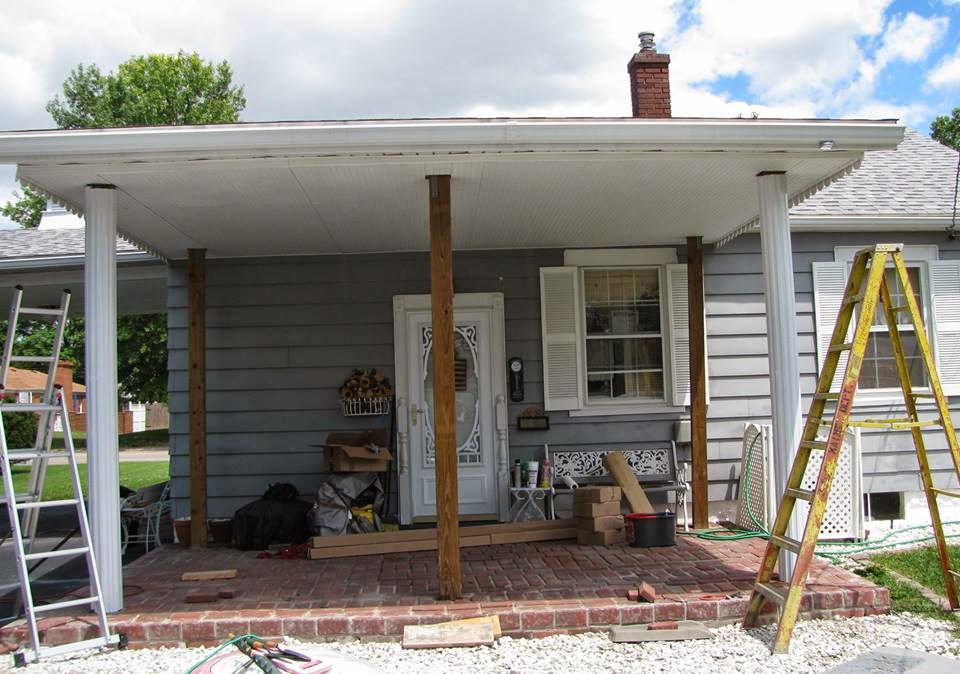
Not to leave you up in the air, but ... in my last post, that's exactly where the patio/porch project was. We had framed the roof and it was need of shingles. After some rookie errors on my part (not knowing that the mismatched colors on the shingles were done that way on purpose because one half would be covered by the next row), we put on a roof.
The next night we got five inches of snow. That pretty much closed the door on finishing the project last year. With the exception of one or two days after that, it was cold and either raining or snowing. No chance really to get it done.

At the end of April, we pulled the tarps off all of the construction materials that had been under wraps for almost six months. Lawrence put scallops on the sides and we closed in the ceiling. FINALLY! I could see the light at the end of the tunnel. And then, we covered  all of the ceiling with beadboard. And at long last, one by one, the columns I had been waiting to see since the day we purchased them in September, began to go up.
After that, we worked around some issues with the caps and bases and installed a ceiling fan. Now, all I have left to do is to caulk the seams between the boards and do some touch-up painting. So, ladies and gentlemen, I give you the almost 100-percent complete patio!
 
It's been a long time coming but I'm so ready to enjoy it. (And have been during its various stages in the past few weeks.) It has been a fabulous addition and one we'll be able to enjoy for a long time to come. I also think it has transformed the entire look of this part of the house. What do you think?


Thursday, July 17, 2014

A Recap ... And a Reveal - Part 1

So, last August I tore down the deck. I didn't know just how we were going to build the covered porch out back that we had been talking about off and on for years. What I did know was that nothing was ever going to happen as long as the ramshackle 10x10 deck was still standing.
It took DAYS to get the deck down. (While the previous owners never did anything else right around here, they DID put that deck together well! But, in typical fashion, they didn't plan it out well. We always thought the deck never went with the house, a fact made more obvious by the fact that its placement also looked like it was just plunked down in the yard.) It took several more days to clear the mess, remove all the rock (white marble chip that we had put around the deck and then layers of Ponderosa rock that had been there previously, buried under layers of plastic).

Then, we mapped out the placement of some 4x6 posts and poured a 12x18 concrete slab around them. I had never poured concrete before. I'd messed with lots of mortar out front so I couldn't imagine it could be too hard. Let's just say it was a once-in-a-lifetime experience for me. Never. Ever. Never again. (Did I mention I will NEVER pour concrete again?)
And then, just as I'd done with the front porch and the old sidewalk, I began covering it with bricks.
And covering it. In all, I put down nearly 1,000 bricks.
And then, after weeks of staring down, things started looking up. Literally.
 
I remember very clearly wondering just how in the name of all that's holy Lawrence and were I going to get that ginormous truss more than 12 feet in the air. But I should have known that Lawrence would have a plan. He is always the man with the plan!
 And it was nothing but up from there on out.

Sunday, July 13, 2014

Better Than Factory


Have I mentioned lately that I love Lawrence?

He has never officially told me no. He has gently nudged me in other directions. He has provided a working alternative. But he has never just flat out said, "No. I'm not doing this."

I know, however, that in all the years we've been working together, that he really, really wanted to say it last weekend. Even as the plan to address the single-piece caps and bases was coming out of his mouth, I knew he really wanted to say, "No, I'm not doing this."

I had asked him if we couldn't just use my miter saw to cut the caps and bases in half and then somehow screw them together. Lawrence’s concern was that it would leave a significant gap if we used the miter saw. “Your gap will be as wide as the blade,” he said. “And we don’t want that.”

But then I saw the wheels turning behind his eyes. He turned to me with that grin that I have come to know so well. “We can get some aluminum strips. We’ll drill holes on each side and then use screws to attach the strips on each side and that will connect them.” That was our plan last Thursday. 

I went to the hardware store that night and bought six feet of 1-inch wide aluminum strips and a metal-cutting blade for my saw. I was going to buy screws, too, but Lawrence said he had those covered.

When he arrived last Saturday though he plopped down a small box of white rivets. “These should let us cinch up the gap a little more,” he said. Unfortunately, they were too short to do the job. (I had to go buy half-inch silver ones instead.) Lawrence also decided that the metal blade would leave an even larger gap so we didn’t use it.

When we cut the first cap/base, we held our breath. As we carefully fitted each half with an aluminum strip, we were anxious to reach  the moment of truth. Taking on the first column, we began the assembly. DRAT! A nasty gap.

Lawrence shook his head. He was quiet for a few minutes and then said: "We need to put the strips on the opposite sides, attach them and then put in a third hole to cinch it all up." And that's what we did. We decided to make the bases our project guinea pigs before moving up to the caps. After doing just a few, we had a system down -- and one that worked. The result? I think it's better than factory.

The good news is that this is the only place you'll see such a gap. The bad news? Blogger won't let me publish a comparison in this post. (D*MN you, Blogger! Been a pain lately with photos.) Hoping that when I do my next post, photos won't be such an issue.

Tuesday, July 8, 2014

Columns! But wait, WTF?!

I managed to score the day off before the Fourth. Lawrence didn't have plans, so we thought that, at long last, we could FINALLY get the columns up. It was a day I had been waiting for since November when they had finally arrived (more than two months after they were ordered) and were hauled home.

We unpacked the first box and searched in vain for instructions. We opened a second box. Still, no instructions. Oh well. It seemed forthright enough. Four rounded panels. You snap them together. All there is to it, right? Not quite.

I'll admit, that first one sent me into small fits of rage. Each time we thought we had it whipped, something went awry. And then, finally ...  There it was! The first one.

I was like a kid in a candy store. Wound up and happy to finally see this. Until we opened up the first of five boxes, each containing a cap and base.

Last fall, when the three-week delivery time on the columns was hitting four weeks (and would ultimately hit nearly nine weeks) I called to change my order. "I can't wait anymore ... the roof has to go on," I said. "I need the two-piece cap and base instead of the one." The two-piece version means I'd be able to wrap the two pieces around the column and attach. OK. Done.

Except here in my hands was a one-piece base and a one-piece cap. WTF?! Now what?!

The ever-unflappable Lawrence shook his head and calmly replied: "I guess we're just putting up columns today." And that's exactly what we did!

Two columns. Then three. (You get the idea by now.)

Slowly, the support posts began to disappear and the patio began to take on a more finished look. I had to pry myself away from the middle of the backyard, each time a new one went up. With everything cleared out of the way so we could work, and the construction materials becoming so many empty boxes, it was coming together – FINALLY – before my very eyes! 

My excitement waned, however, when conversation shifted back to the caps and bases. Having taken almost nine weeks to get them, I did not relish the thought of extending this project ANOTHER nine weeks. (By that point, we’d surpass a year since starting!) But what were my options? Before we called it a day on Thursday (nearly 10 hours in), Lawrence and I had arrived at a plan when he returned on Saturday. Would it work? We’d soon find out.

Monday, July 7, 2014

Dead Woman Walking

Today I returned to work after a four-day weekend. Before you envy me too much, I spent 40+ hours of that time working on the patio. But I'm getting too far ahead in the update.

A few weekends ago, I discovered a fabulous new tool: a drywall lift. I had already mentioned that Lawrence and I struggled with the plywood for the ceiling. But, since it was going to be covered by beadboard, we wouldn't need to put it up in full strips; we could slice and dice into more manageable pieces. With the beadboard though, that wasn't an option. It was bad enough that we were having to piece it together at the ends because the panels are 8 feet long while the patio ceiling is 12 feet long. (The resulting gaps have yet to be caulked. But, I digress.)

Before we could even get started on the patio, the mother decided that she wanted the carport to have a beadboard ceiling, too. Sigh. Another trip to the hardware store.

But, on this particular day, the trip to the hardware store, we rented the lift. Interesting contraption that. It's on wheels and has a crank that lifts a tiltable easel that you load your board onto. From there, it's up, up and away! Once you get the board in place, you lock the wheel and the pressure holds it there. Not that I ever plan such a job again, but if I did, I wouldn't do it without renting one of these babies!

Before that weekend had ended, we had installed more than 400 square feet of beadboard. Some in the carport (which also got a new light and a fancy new medallion). And then, there was the patio. A nice hole in the middle got the wiring pulled through, just waiting for a fan/light to be attached. (A photo I'd love to share but Blogger is having none of it.)

Next stop: COLUMNS!


Saturday, July 5, 2014

A Crew Member Moves On

As Lawrence and I were working over Memorial Day weekend, a car pulled up in the alley at the edge of the driveway. A man got out and approached us.

"I don't mean to bother people who are working," he began. "What's the story on your Thunderbird there? Is it running?"

"Yes, but not well," I responded. "She needs work."

And then, the ultimate question: "Is she for sale?"  It seems the guy had bought a motor for his son's aging T-bird but the chassis was so rusted out he was afraid that "the motor would go right through the car." He'd been looking for a while and noticed Ladybird a while back

For many months, the mother and I had discussed what to do with Ladybird. While she hadn't settled completely on any option, the one the mother absolutely did not want to do was to sink more money into getting her fixed. As much as I missed having her running, I had to admit that it was a wise choice. The car is 23 years old. It probably has 140,000 to 150,000 miles on it. It probably would need at least, being conservative, $800-$900 to get up and running again in some kind of shape.

I told the mother about the offer and gave her the guy's phone number. About three days later, she finally called him. And two weeks ago, Ladybird, who had been idled in the driveway for almost eight months, drove away.

She not only left a noticeable hole in the driveway, but she left a hole in my heart, too. LB and I have had many adventures together. That car hauled as much, if not more, than any truck ever could. Her trunk alone was larger than some small cars!

So, goodbye and good luck, Ladybird. You served us more than well and we'll always think of you fondly.


Tuesday, July 1, 2014

Channeling Michelangelo

Getting back to the progress on the porch ...

Once we got the back sealed up, Lawrence came and added the shingles to the sides of the porch. In the "Let's Make the Whole House Match" department, we were getting closer to .1000.  Bricks? Check. Scallops? Check! That leaves just beadboard and columns to go.

Once the scallops were in place, Lawrence and I took on a few tasks:

1) Putting the wiring in place to eventually power a ceiling fan and light

2) Installing a brace to hold the future ceiling fan, and
3) Enclosing the ceiling in plywood, a surface that would eventually get covered in beadboard.

It sounds easy. The first item on the list I was the most concerned about. After putting in the outdoor outlet some years back, and then adding two more indoors since, I know what a pain-in-the-*ss job wiring is. When we started, I steeled myself for a lengthy and difficult process.

It only took a little more than 30 minutes, most of which was spent drilling a hole above the door, near where the existing light fixture is mounted. Once the hole was drilled through, Lawrence started to fish around inside it. Then he began to laugh. He had successfully thread the wire through. Two minutes later, the wire was pulled across to the center of the ceiling. Voila!

We were going to attempt Job 2 when Lawrence said we had to finish Job 3 first. So, that's what we set about doing. The first sheet of plywood was murder. WHAT IN THE HELL WERE WE THINKING?! Hoisting a full sheet of 3/4-inch plywood over one's head, balanced in part by a 76-year-old man who isn't any bigger than me and then, attempting to wrest it into place in a manner slightly resembling level ... let's just say it wasn't the brightest thing I've ever done. Then I remembered: Lawrence and I had talked about this. We knew we weren't going to make it through the project THIS way. Since we were going to put beadboard over it anyway, we cut the panels in half.

What a difference! Still heavy. Still labor intensive. But infinitely better. And we managed to get it finished, too. With that task complete, Lawrence put up the flashing. Hey, it's starting to look a lot less like the Beverly Hillbillies! Maybe something really will come of all this.

Next stop: beadboard.